
Sick and getting tired with those evil-bay seller charges premium prices on such a tiny bit of stuff while you can actually have/do it with a laughable cost ?
Some sifu may have discovered this method ages ago. While this was actually discovered by my missus . This a cheaper easier way to add attention to details on your mandollies.
It rather easy actually - no need visual aids these time.
1. You need a to find yourself those patches you wanted on the internet. Don't worry about the resolutions but make sure its clear.
2. You need a photo editting software (of your own choice) i.e Photoshop,Paint.net or even Paint Brush !!!
3. Cropped / resized the your desire patches to 1/6 size. Use you own logic here else no one can help you.
4. Test printout on black but with a better resolution setup. - This is to ensure your patch size and details <- at least visible
5. After everything A-ok, proceed with the color setup using the highest end printing setup.
6. Once printed out. Use a double-sided tape to tape and cover all the area of the printed area.
7. Cut out the shape of your patches accordingly , peel off the double-sided tape and stick it on your figure.
8. Voila - your done
Note : - Works even better on a highend printer as the patches will be so damn clear. Do so only if you have a complicated patches such those SEAL TEAM patches.
Showing posts with label Tutorial 001. Show all posts
Showing posts with label Tutorial 001. Show all posts
Tuesday, May 19, 2009

Monday, May 4, 2009
[Tutorial] - BBi G3 buff 'em up
As promise to a fellow comrades, I here to demonstrate a simple yet effective way to buff up BBi G3 / Soldier Story S1 bodies.
As they are the cheapest among the most articulated bodies, they are preferred choice among 1/6 bashers. But then, the bodies design are abit too much out of proportions especially on the abs - chest - thigh (in-seems) areas.
Some may think its not important on such issues since those are are usually covered by 1/6 clothing or gears. But I beg the differ. It won't look natural.
This tutorial are solely made by myself based on my own experiences and judgements as well as method found similar over the net.
To start of this tutorial, you'll need items such as:-

1. Duct-tape
2. Wad of cottons
3. Scissors
4. Tweezers
5. Protective foams
Some may wonder, what the heck is that protective foams. You can easily get those you purchases of your rig (if you still keep those boxes) in those motherboard or graphic cards boxes. Another alternatives is get it from IT shops since they have loads of supplies with them.
FYI, Very Hot boxset too have these pads inside their box. Recycle !!!

and of course the body !! Picture shown is a Soldier Story S1 body which is 99% identical with BBi G3 bodies.

Here's a sample figure that I have not apply padding you will note the difference at the end of this tutorial.

Notice that the gap in between his leg/crotch. Try stand up and see if you yourself have any of those gap. If so, you either have a huge ball or just too skinny which NO military institution would recruit you.

This is an actual BBi G3 (knock-off ver.) body. Notice the straight and slender part of his thigh ?? that's isn't normal eh ? This where this tutorial to the rescue !!~~

Cut the protective foams in to shape (use your logic of the size). Wrap around the inner part of the thigh (in-seems) and leave the outside with padding.

Of course use the duct-tape to secure them in place. Please do not use a double-sided tape as your will have a "fun-time" removing them. You're WARNED !!
Repeat the same thing on the other leg (thigh) ,again - use your own logic please ~~

WOW!! Look at those abs. This only exist in MR.Universe show or cartoons/animes or even comics. Sum it up, fantastically fantasy body !!

Cut a foam and place it around the abs. Apply the same method as you did on the thigh. But there's a catch. Here, my figure is wearing a t-shirt. So I need not to tape them around the abs. Because if you DID tape them, you will limits the articulations of that area. Just cover them with your clothes or improvise with you own method.

This how it look, after those pads we're applied.

You must have been wondering what the heck with those cottons eh ? So here it is now.

Most tactical pants will have a khaki pockets. Fill those cottons to make it to have a loose hanging looks.

Use a tweezers to stuff the pockets. Unless you have a tiny fingers - you may have it your way then.

After you've stuff those cottons. Clip the tweezers and push down the cottons so that it will only fill up the lower portion on the pocket.

Another angle of pushing down the cottons.

This how it looks like after everything are applied.

The final say is yours. Still notice the gap in the middle now ?
Hope this tutorial help. Please leave your shares and comments so that we can have a better way to tackle this.
Saturday, September 27, 2008
1/6 Bendable Hand Tutorial
Moons ago where I posted "here"


so I think I should re-post it again. ~yeayea~ I'm out of idea to post something new.
Here's my 1st ever tutorial in 1/6 hobby. If I cause confusions - too bad - you just have to live with it.. lolz :twisted:
Here goes. Thanks to a fellow member here thought me the trick of doing this. IVAN *respect*
Ever get frustrated when you beautiful bendy hand can't hold you weapon sturdy and often fell off when you wanna pose with your "BIG" guns !!!???!!!
Here's a simple solution to ease your pain and strike more pain to your figs [will emphasize this later]
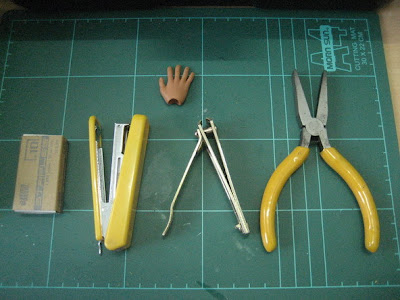
- First off you need a stapler loaded with [ammo/bullet/clip or whatever you call it] , wire bender/plier, nail clipper and a bendable hand of course !!!

In this tutorial i used a Hot Toys (TM) Truetype Bronze Body Bendable Hand
- Then, unload a single staple clip like so [shown on the pics below]


This method is an easier to unload a clip rather trying to etch off from the full-lot of the stapler magazine
- You will get a clip exactly shown on the picture below. This will let you bend the clip into a straight wire-like object.

- Now, hold the staple clip with a plier/wire bender.


Please use your own logic on how to make this straight.
Now here's the painful process I mentioned before.
Poke your bendy finger with your already made staple-clip wire as shown on the pic. Do not rush and take your time enjoy the torturous process on your bendy finger. Bit by bit, slowly and poke it deeper and deeper. Until your staple-clip wire all the way inside the finger.


Oh-no !!! First timer usually face this problem that the stapler-clip wire often poked out half-way of the finger [if this did not happened on you on your 1st try - it's call beginner's luck]. No sweat !!! Just pull it out slowly and poke it again. Just make sure you keep you bendy finger straight during this surreal process.

Ouch - we have exit wound. 'fraid not - just repeat the process again.
Once the staple-clip wire all the way in. Test you bendy finger simply by bending it [the logical direction of course] There should be a bit of excessive bit of the wire left on the tip of your bendy finger. Don't worry - just use the nail clipper and nip it off !!!

wire all in

bend it the logic way - need it remind you ?

Nip the excessive wire away.
Repeat the same process to all the remaining fingers and you're DONE
-Don't worry about the mark on the bendy hand, once you gloved it. It'll hide it well...

ALTERNATIVE METHOD
Some may ask, what if I'm using fingerless gloves or just simply yet - bare hand.
Here's the alternative method.
You still apply the same rule on making the wire straight. Just the poking in different way.
Start the poking from your bendy band palm all the way up toward your finger.


**CAUTION** Remember not to "over-poked" else this method will be in vain.
--REINFORCE--
Incase you think your bendy finger not stiff enough. Just apply the wired again.
--------------------------------------
Tutorial and pic by Nerdpride
Special thanks to Ivan and OSM
Subscribe to:
Posts (Atom)





 Posts
Posts

